First-run setup
Owner account, boot configuration, and connecting your first model provider.
First-time setup is one interactive command. Run it from the Neuralis
application folder before starting the app (and before the first
docker compose up — it creates the data directories with correct ownership):
pnpm neuralis:setupThe script auto-detects your environment — platform (Linux, macOS, Windows, WSL2), Docker availability, a running Qdrant, a running Ollama, and any existing Neuralis data directory — and only asks for what genuinely requires human input.
What the script asks
- Owner account. Email, password (minimum 8 characters, hashed with bcrypt before it is stored), and display name. This is the admin user with full access — the only account that exists after setup.
- Deployment mode. Docker stack or native process. This decides how
loopback service URLs are recorded: in Docker mode,
127.0.0.1URLs for host-native services (such as a local Ollama) are rewritten tohost.docker.internalso the container can reach them. - AI provider keys. Anthropic, Google Gemini, and DeepSeek up front; MiniMax, Kimi, Qwen, and xAI behind a "more providers" prompt. Every key is optional — skip them all and add keys later in the admin UI.
- OpenAI. Wired separately because there are two paths: a plain API key
(per-token billing) or Sign in with ChatGPT (OAuth against a ChatGPT
subscription for Codex models). You can also import an existing official
Codex CLI login from
~/.codex/auth.json, configure both, or skip. - Qdrant. Use the compose-managed sidecar (Docker), point at an external
Qdrant URL, let the script download and start a Qdrant binary (native, no
Docker), or skip — skipping means keyword-only search and no persistent
vector memory. For the compose-managed and binary modes setup mints a
Qdrant API key into
.env(preserved on re-runs) and the server enforces it; for an external instance you are asked for its key instead. - Custom LLM endpoints. The script probes the standard ports for Ollama,
LM Studio, vLLM, llama.cpp server, and LocalAI, and lets you register any
reachable endpoint as a chat-model source. You can also add one by hand —
including a remote gateway: the wizard asks for its API key (stored
encrypted in the credential store, never in
.env) and whether the address is private or public, which is what decides whether the outbound address check applies. Everything here is editable later in the admin Credentials tab. - Embeddings. Pick the embedding provider and model for vector memory —
local Ollama (free), OpenAI, Gemini, Qwen, Voyage, any OpenAI-compatible
/v1/embeddingsserver of your own (URL, model, dimension, key and address class), or a deterministic dev-only mode — plus the vector dimension where the model supports more than one. A new install is steered to Gemini Embedding 2 at 3072 dimensions; use a paid Gemini key, because on the free tier Google may use the content you embed. Embedding runs on its own key (embedding.openai,embedding.gemini,embedding.qwen,embedding.voyage, orembedding.endpoint.<id>for your own server), counted and capped apart from chat; the wizard offers the chat key you already typed, stored separately. Without a key, embedding stays off until you set it in the admin Credentials tab. Changing the model later is a rebuild you start from the admin Vector section — see memory and sync. - Machine desktop. The first beta includes Ubuntu + XFCE for the
machine package. Its Neuralis image download can run
in the background or be skipped; opening a desktop may still wait for the
download to finish. Operators can configure their own compatible image
through
machineImage. - Project name. Your first project; the name is slugified into the project id.
What it writes
| Artifact | Location | Contents |
|---|---|---|
| Data directory skeleton | ~/.neuralis/ | app/ (platform zone) and projects/<id>/ (project zone) |
| Owner record | ~/.neuralis/app/users/ | The owner account with the bcrypt password hash |
| Project record | ~/.neuralis/app/projects/ | The first project, with you as owner |
| Default sources | per project | The data:// and packages:// filesystem sources |
| Credential keys | ~/.neuralis/app/ | A generated master key and installation salt for credential encryption |
| Encrypted credentials | ~/.neuralis/app/credentials/ | Every provider key you entered, AES-256-GCM encrypted |
| Platform config | ~/.neuralis/app/config/platform.json | Embedding model and dimension, custom LLM and embedding endpoints, runtime settings |
.env | application folder | Boot-critical values only: ports, NEXTAUTH_SECRET, the Qdrant API key, data-root path, deployment flags |
docker-compose.yml | next to .env | The Docker topology, generated for this machine: services (app, Qdrant when compose-managed, Ollama when chosen), concrete user/group IDs and ports, a version-stamp header |
The four configuration layers
Setup deliberately splits configuration four ways, and that split holds for the lifetime of the deployment:
.envis boot-critical only — ports, URLs, the NextAuth secret, the data-root path. Nothing you would edit at runtime.- Platform config holds runtime settings (embedding model, custom LLM and embedding endpoints, feature flags) and is edited from the admin UI.
- The credential store holds every long-lived secret — provider keys,
OAuth tokens, MCP keys — encrypted at rest and scoped per platform, user,
project, or agent. Provider keys you typed during setup land here, not in
.env— and never in compose environment blocks, which any Docker-socket holder can read viadocker inspect. - The generated
docker-compose.ymlis machine-specific topology — a setup artifact like.env, not a shipped file. Re-runpnpm neuralis:setup --compose-onlyto regenerate it (no questions) after editing.envor updating Neuralis. Machine-local extra mounts live in a separatedocker-compose.override.ymlowned by the mount tooling and survive regeneration.
See configuration for the full model and credentials for scoping and resolution rules.
Sign in and create your first agent
Start the app (docker compose up -d or pnpm start) and open
http://localhost:3100. Sign in with the owner email and password from setup.
A fresh project contains no agents, so the workspace shows a single "Create your first agent" prompt. Give the agent a name and create it — agents are AI assistants with their own model selection, system prompt, and tool access (see agent-core).
Start the first conversation
With an agent selected, the chat widget opens automatically. Type a message and send it. The composer's bottom bar carries the runtime controls — model picker, reasoning effort, permission profile, and per-conversation package toggles — all covered in the workspace tour.
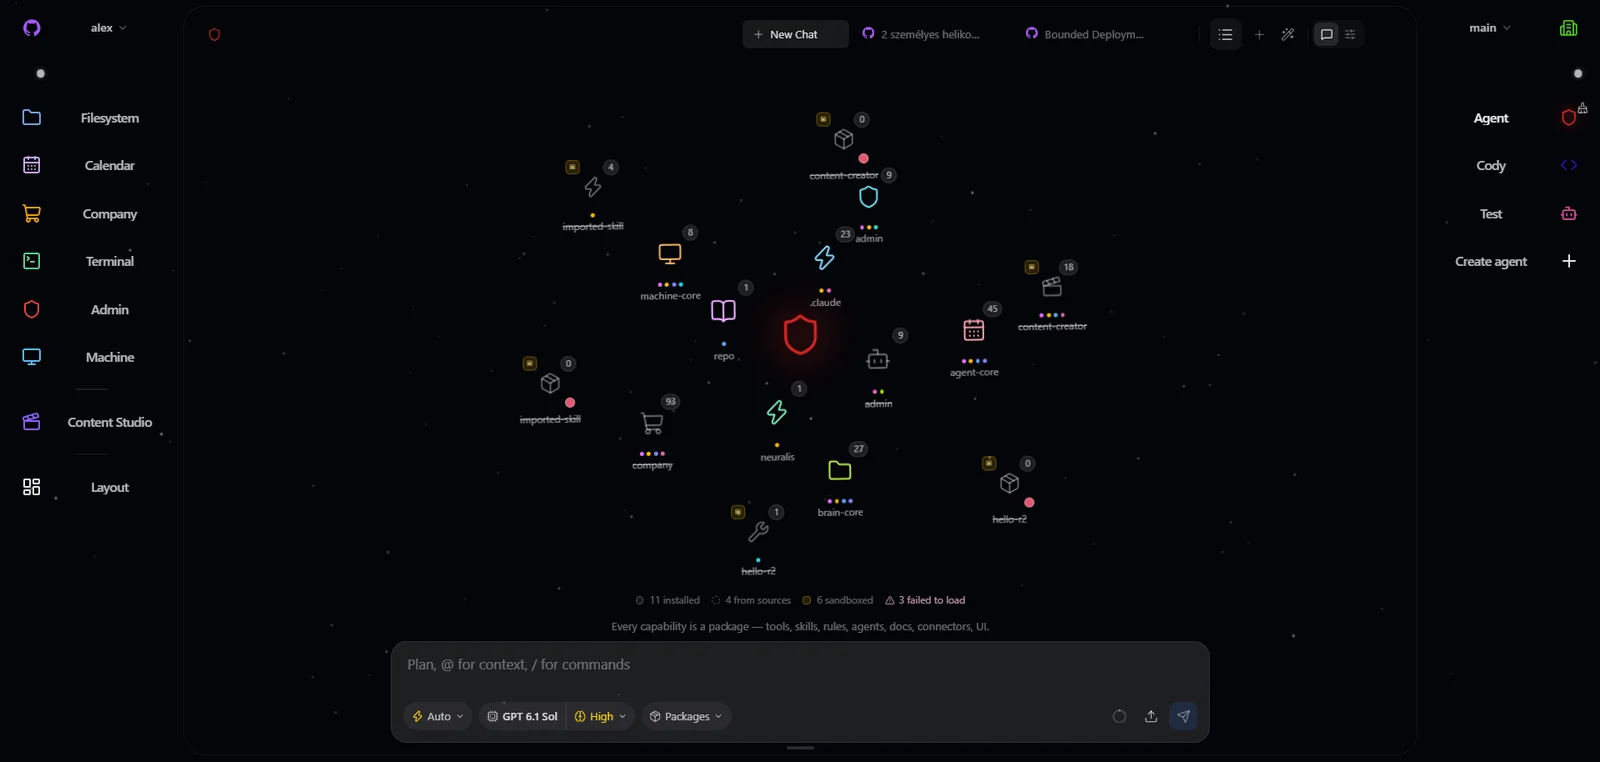
The Package Constellation in a customized installation. Its package set and agent choices are examples, not the default installation.
If you skipped every provider during setup, connect one first: open the admin
widget, go to the Credentials tab, and add a provider API key (writing one
needs project.credentials.write, which no role below the admin tier holds by
default). The matching models appear in the chat model picker immediately —
see providers and models.